Submodules
COBRA Toolbox Submodules Ecosystem

This tutorial explains how the COBRA Toolbox ecosystem of repositories is organised and how you should contribute new material. It is intended for contributors who want to add binaries, models, paper specific code or tutorials that will appear on the COBRA Toolbox website.
A key point
In order to add a file to any of these repositories, you must add it directly to the corresponding main repository on GitHub (for example COBRA.tutorials, COBRA.models and so on), not to the opencobra/cobratoolbox repository.
The cobratoolbox repository only contains submodule pointers. The actual content lives in the external repositories listed below.
Understanding submodules in the COBRA Toolbox
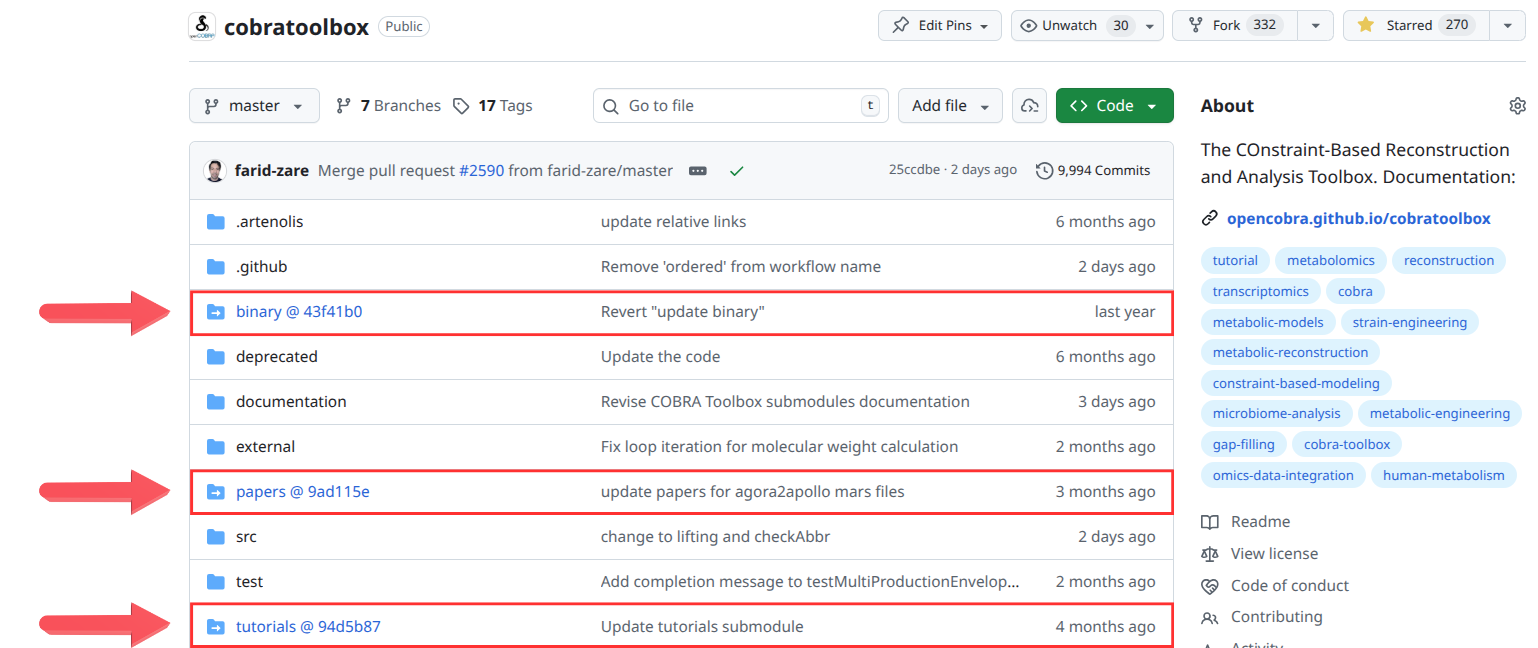
The COBRA Toolbox repository contains several folders that appear in blue when viewed on GitHub. These are not ordinary folders. Each of them is a git submodule that points to a specific commit of an external repository.
How submodules appear
In the GitHub file browser, each submodule is shown as a blue folder icon followed by an identifier in the form:
folderName @ <commitHash>
The commit hash indicates the exact state of the external repository that the main toolbox is currently referencing. The folder does not contain the actual data. It contains only a pointer to another repository.
For example:
binary @ 43f41b0papers @ 9ad115etutorials @ 94d5b87
Each of these links to a different repository in the COBRA ecosystem.
Automatic updates through initCobraToolbox
When users run initCobraToolbox for the first time, the script automatically performs:
git submodule update --init --remote
This operation fetches the latest commits from the default branch (master or main) of every submodule. As a result, the local installation is always updated to the most recent versions of:
COBRA.binary
COBRA.papers
COBRA.tutorials
COBRA.models
Only maintainers update the submodule pointers inside the main toolbox repository. Contributors should always add content to the external repositories themselves.
Why submodules are used
Submodules keep the main toolbox lightweight and modular:
Large binaries live in their own repository.
Tutorials are published independently.
Models and paper specific code are stored externally for clarity and version control.
This design ensures that each component can evolve independently while allowing the toolbox to reference precise, reproducible versions of all resources.
Overall repository layout
Main toolbox repository
The central codebase is hosted at:
This repository contains the core code and the submodule references to external repositories responsible for storing binaries, tutorials, models and paper specific content.
Submodules:
COBRA.binary
Repository: https://github.com/opencobra/COBRA.binary
Purpose: This repository stores large binary files required by the COBRA Toolbox. Keeping these files here prevents the main repositories from becoming too large.
Contribution guidelines
Add all binary assets to COBRA.binary.
Do not store binary files directly in opencobra/cobratoolbox.
COBRA.papers
Repository: https://github.com/opencobra/COBRA.papers
Purpose: This repository contains folders for published papers in genome-scale modelling. Each folder holds reproduction scripts, workflows and visualisation resources.
Contribution guidelines
Add paper specific content to COBRA.papers.
Do not commit paper folders or code into opencobra/cobratoolbox.
COBRA.tutorials
Repository: https://github.com/opencobra/COBRA.tutorials
Purpose: This repository stores MATLAB live script tutorials (.mlx). A continuous integration pipeline automatically publishes new tutorials to the website:
Contribution guidelines
Add MLX tutorials directly to COBRA.tutorials.
Do not add tutorial files to the main toolbox.
COBRA.models
Repository: https://github.com/opencobra/COBRA.models
Purpose: This repository stores genome scale metabolic models. Using this repository prevents unnecessary growth of the main toolbox.
Contribution guidelines
Add models to COBRA.models.
Do not add model files to opencobra/cobratoolbox.
How to contribute in practice
Select the correct repository
Binaries: COBRA.binary
Paper specific content: COBRA.papers
Tutorials (MLX): COBRA.tutorials
Models: COBRA.models
Work directly in that repository
Fork the correct repository (for example COBRA.tutorials).
Clone it locally, create a branch and add your files.
Open a pull request
Submit your pull request to the correct repository, not to opencobra/cobratoolbox.
Submodule pointer updates
After your contribution is merged, maintainers will update the submodule pointer in the main toolbox.
Contribute a tutorial of your work to the COBRA Tutorials.
A template for generating a new tutorial is provided here.
Overview
The COBRA.tutorials repository exists to collect and maintain tutorials for developed and published constraint-based genome-scale modelling methods and studies. Its purpose is to provide clear, reproducible instructional material that demonstrates how new algorithms, workflows, and analysis techniques can be applied within the COBRA modelling framework. By centralising these tutorials, the repository supports both new and experienced users in learning, comparing, and adopting state-of-the-art constraint-based modelling approaches.
Repository structure
Tutorials are here to get you started with using The COBRA
Toolbox. The
tutorials are grouped according to the src/ folder structure:
All tutorials are provided in these formats: .mlx, .m, and .html.
The interactive version
.mlxis a MATLAB Live Script format and can be run using the MATLAB Live-script editor.The static version
.htmlis automatically generated and is accessible on the tutorial section of the COBRA Toolbox documentation.The
.mversion can be opened and run directly in MATLAB, which is particularly useful for building new analysis scripts based on existing tutorials.
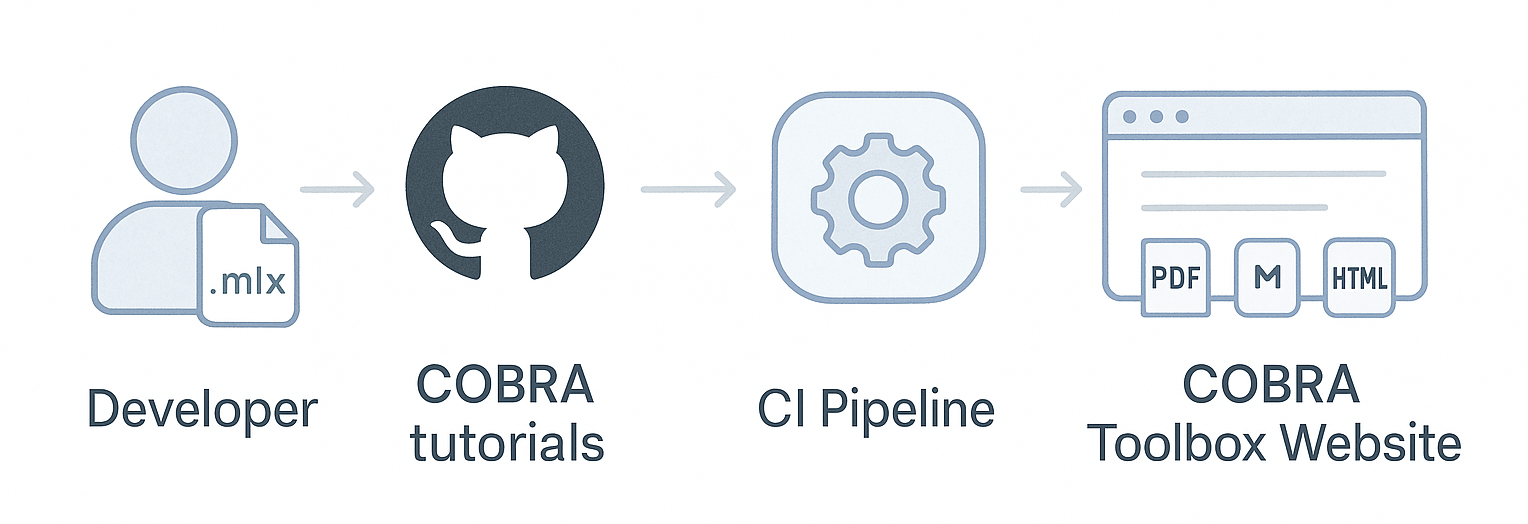
How the Continuous Integration (CI) System Works
The COBRA.tutorials repository uses an automated continuous integration (CI) workflow.
When a contributor pushes a new or updated .mlx tutorial to the repository:
The CI pipeline is automatically triggered.
The
.mlxfile is converted into two formats: -.m(MATLAB script) -.html(web-friendly version)These generated files are published to the COBRA Toolbox website, making the tutorial immediately accessible to users.
The diagram below illustrates this workflow:
A template for generating a new tutorial is provided here.
Contribute a new tutorial or modify an existing tutorial
Fork and checkout your branch
Fork the COBRA.tutorials repository on Github.
Clone the forked repository to a directory of your choice:
git clone git@github.com:<userName>/COBRA.tutorials.git fork-COBRA.tutorials.gitChange to the directory:
cd fork-COBRA.tutorials.git/Set the upstream to the
opencobra/COBRA.tutorialsrepository:git remote add upstream git@github.com:opencobra/COBRA.tutorials.gitFetch from the upstream repository:
git fetch upstreamCheckout a new branch from
upstream/master:git checkout -b master upstream/masterNow, make your changes to the tutorial in MATLAB.
Submit your changes and open a pull request to the master branch
Once you are done making changes, add the files to your branch (
tutorial_<yourFile>refers to the tutorial name). Make sure to add the.mlxformat of the tutorial.git add tutorial_<yourFile>.mlx git commit -m "Changes to tutorial_<yourFile>"
Push your commits on
<yourBranch>to your fork:git push origin <yourBranch>Browse to your fork on:
https://www.github.com/<yourUserName>/COBRA.tutorials
Click on Compare & Pull Request.
Confirm the target branch is
master.Submit your pull request.
Wait until your pull request is accepted.
Key reminders
The main toolbox lives at opencobra/cobratoolbox.
All binaries, models, tutorials and paper specific content must be added to their dedicated repositories.
Add files directly to the appropriate main repository, not to the toolbox.
Using the correct repository keeps the ecosystem clean, modular and maintainable.
Following these guidelines ensures your work is properly integrated and supports the COBRA community effectively.